How to Automate Docker Image Creation for Postgres Using Shell Commands

If you have certain lines of code that repeat over and over again in a project, there's a pretty standard solution for it: using a function.
But what about when you have the same project file setup that gets repeated over and over? How do you solve that?
Meet bash scripting. Bash scripts are written to execute certain sequences of commands on your machine automatically without you having to do anything. This is known as workflow automation, and that's what I'll be teaching you how to do in this article.
Table Of Contents
- Prerequisites
- What Motivated This Project?
- Introduction
- Conditions in bash
- Interactive Shell
- How to Create and Write to a File
- Bash Arguments and Flags
- How to Make Your Scripts Executable and Available on Your PC's Path
- Conclusion
Prerequisites
To follow along with this article, you should have:
- Git-bash installed on your machine
- Some experience using a terminal or command prompt to run and execute commands (helpful but not required)
- Understanding of basic programming concepts (like conditions and loops)
- Docker installed on your machine
- Basic understanding of Docker concepts (like images and containers)
- Experience using Postgres (optional but recommended)
What Motivated This Project?
I was recently setting up a Docker image for Postgres on a few projects I was working on, and I noticed that I was following the same pattern in creating the images. The only difference was that they had different database credentials and database names.
I also realized that a large portion of today's rapidly developed apps tend to use Supabase as their backend, which can come with resource limits such as database storage, bandwidth, concurrent connections, and API request quotas (depending on the service tier and size of the project). And these issues can be solved by setting up your database.
So I thought, why not make a CLI tool that could automate creating Docker images for Postgres? That's when I learned about writing executable shell commands using bash to create workflow automations.
You can find the full working example used in this guide in this git-repo.
Introduction
Bash is a shell and scripting language used to write and execute commands or scripts that perform operations on a computer, such as creating directories and files, manipulating files, automating tasks, and managing system processes.
In this guide, you'll learn to automate the process of creating a Docker image for a Postgres database so that you don't have to create the image from scratch for each new project.
Bash Scripting File Setup
To get started, open you preferred text-editor and create a directory or folder there. Then within that directory, create a file with the extension .sh.
At the beginning of a file, type:
#!/bin/bash #!/bin/bash (known as a "shebang") tells the operating system to run the script using the Bash shell, so the commands inside the file are executed as Bash/terminal commands.
Conditions in bash
After you've finished creating a script file and adding shebang, let's start by exploring how if statements are used in bash.
The syntax of if looks like this:
if [[ condition ]]; then command to execute fi The if in bash is no different from what you're used to in other programming languages:
- You use double square braces ([]) to add a condition you're checking against and a semicolon (;).
- You use
thenafter theifdeclaration to specify what should be executed if the condition is true. - You use the
fito close the condition statement.
When you're writing the condition inside the square braces, make sure you leave a space before the condition and another one after it (as you can see in the code above). If you omit these spaces, you'll get errors.
Working Example:
Since we are automating Postgres database Docker image creation, first check if the file exists and has content. If it does have content, end the script. If not, we'll proceed with the next script.
#!/bin/bash if [[ -s docker-compose.yml ]]; then echo "The file already exists" exit 0 fi echo "Next command" In the if condition, we use the flag -s to check if the file exists and has contents. File flags check file availability and permissions, and include but aren't limited to:
- -f: used to check if the file exists
- -s: used to check if the file exists and has contents
- -d: used to check if a directory exists
- -r: used to check if a file is readable
- -w: used to check if a file is writable
- -x: used to check if a file is executable
In the script, we're using -s to check if a file named docker-compose.yml exists in the directory where we're executing the command. If it's false, we use the echo keyword to print the text "Next command". If it's true, we print the text "The file already exists".
exit acts as a return keyword for bash scripting, 0 is used for success, and 1 is used for failure.
Let's test all this by creating a Docker Compose file and adding some content in the same directory where we're writing the bash script. In your terminal type bash name-of-file.sh, and you should see "The file already exists":
But if we delete the content in the file and run the command again, we should see the output saying "Next command":

Interactive Shell
To make an automation dynamic and flexible you will need to receive inputs, take an example of a database name you won't always have the same database name, the name will change based on the project,
you do need to setup away to use a given name of the database when creating a new docker image for that you read inputs using the read keyword.
There are different types of inputs based on the operation. And there are flags that are used to specify which type of input you're expecting, such as:
- -p: for prompting the user to write a text
- -s: used on passwords when you want the user input to stay hidden when writing it in the terminal
- -a: used when you're expecting the user to pass in multiple inputs or if you're expecting an array from user.
Here's the syntax for reading user input:
read -p 'input_label: ' variable_name Working Example:
Now let's create scripts to receive user input about the Postgres database image you're going to create.
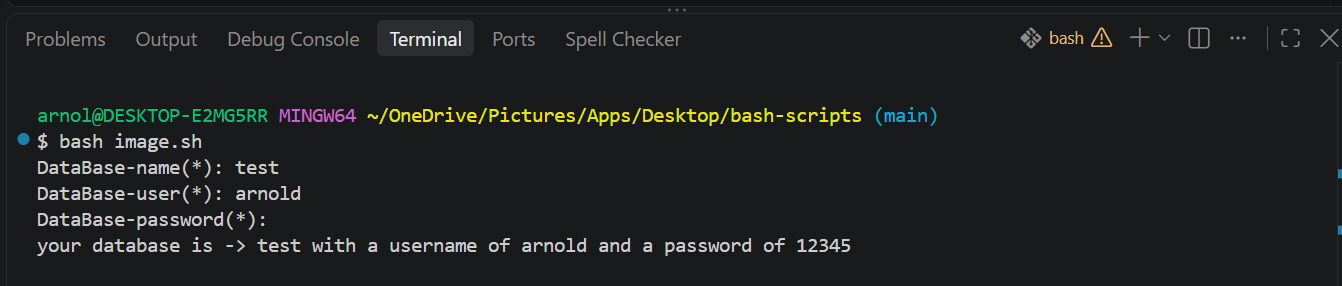
#!/bin/bash # database credentials read -p 'DataBase-name(*): ' db read -p 'DataBase-user(*): ' user read -sp 'DataBase-password(*): ' pwd echo echo "your database is -> $db with a username of $user and a password of $pwd" The script uses -p on the read keyword that prompts a string of text and -sp that prompts the user to enter a string of text that's hidden (because the -s hides what's being typed).
If you don't use the -p option together with -s, you won't be able to display a prompt asking the user to enter a password. With -s alone, the input is hidden, but no prompt is shown unless you print one using echo or printf.
To print or use the input the user has added, use the dollar sign ($) followed with a variable name for the input you're expecting from the user. In the example above, we named the variable for getting the database name db, so we'll use $db when we want to access the name of the database the user has input.
Now if you run the script in the terminal, you should see a sequence of terminal prompts waiting for inputs. Once they're filled, you'll see all the input's values in the terminal:
How to Validate and Sanitize Input
You'll also need to validate input before executing anything. This is important because sometimes crucial field might be missing or mistyped. For example, you might forget to input the database name for the image you're trying to create.
When validating input, you'll use one of these flags (among others):
- -z: checks if a variable value is empty
- -n: checks if a variable value is not empty
- -lt: checks if a number is less than a given number
- -gt: checks if a number is greater than a given number
- -eq: checks for equality of two values
You can use the -z flag on every input that you need to make sure isn't empty before moving on to the next step:
#!/bin/bash # database credentials read -p 'DataBase-name(*): ' db if [[ -z $db ]] then echo "The database field cannot be empty!" exit 1 fi read -p 'DataBase-user(*): ' user if [[ -z $user ]] then echo "The user field cannot be empty!" exit 1 fi read -sp 'DataBase-password(*): ' pwd if [[ -z $pwd ]] then echo "The password field cannot be empty!" exit 1 fi This script helps you make sure that all critical information about the database is present before proceeding to another input.
Default Values
You may want some fields to use default value (for example, the container name of the image, port, or volume of the container). For such scenarios you can use := to assign a variable default value:
#!/bin/bash # container information read -p 'Container-name: ' container_name read -p 'Container-port(if omitted, the container will use default postgresql default port of 5432): ' port read -p 'Volume-name: ' vol_name echo "container-name-> ${container_name:=cont_one}, port->${port:=5432}, volume_name->${vol_name:=backend_data}" When you run the script and skip all three of those inputs, bash will use the default value(s) you've used as fallbacks.

But if you pass value for those inputs, bash uses the provided values. For example, supply all three inputs and see the output you get:

How to Create and Write to a File
Now that you know how to create a Docker image for a Postgres database, you need to create a docker-compose.yml file that will be executed when starting and stopping your containers.
In Bash, there are multiple ways of creating a file:
- First, you can use
> filename. This creates a file if it doesn't exist. If it exists, its contents are overwritten (replaced). - There's also
>> filename: This appends contents to a file or creates a file if one doesn't exist. - Finally, there's
touch filename: This creates a file if it doesn't exist. If the file already exists, its contents are preserved and only the file's timestamps are updated.
How to Use > to Create and Write to a File
When you want to create a file and write content to it at the same time, you'll want to use echo in front of > and then add the filename, like this:
#!/bin/bash echo Hello> test.txt This will create a test.txt file with "hello" as content inside.
How to Use >> to Append Contents to an Existing File
To append contents to an existing file, add the contents before the >> and then follow with the filename you want to append content onto. Let's add Africa after Hello in the test.txt file we created in the previous script.
#!/bin/bash echo Africa!>> test.txt Now test.txt will have Hello and Africa! on the new line.
Using those symbols, let's create a docker-compose.yml file that will hold contents about our Postgres database setup.
#!/bin/bash > docker-compose.yml And just like that you have your docker-compose file created in your directory.
How to Write Multiple Different Contents to a File
You can also use the cat keyword to write to a file. Typically, cat is used for reading the contents of a file. But when you combine it with <<EOF and the sign for appending contents to a file >> (that we just discussed), you can add multiple contents to a file in the format you want. The syntax looks like this:
# writing docker compose contents cat <<EOF>> docker-compose.yml # file contents EOF The <<EOF tells bash to write contents to a file until it finds the EOF keyword (end of file). Then you use >> filename to append the contents to the file. With a Docker compose setup it would look like this:
#!/bin/bash #file creation and writing > docker-compose.yml cat<<EOF>>docker-compose.yml services: postgres: image: postgres:18-alpine container_name: ${container_name:= $db} environment: POSTGRES_USER: $user POSTGRES_PASSWORD: $pwd POSTGRES_database: $db ports: - ${port:=5432}:5432 volumes: - ${vol_name:=database-data}:/var/postgresql volumes: ${vol_name:=database-data}: EOF Bash Arguments and Flags
With Bash arguments, you can pass values in the same line while executing a script. To use arguments, add the values while executing the script on the same line, like this:
bash script val1 val2 To read arguments value(s), use the dollar sign ($) followed by the position in which you inputted your values (positions start at 1, not 0).
In the example, if you want to echo the content of the second argument value, you can use echo $2.
To understand this better, let's enhance data input experience by passing the database credentials on the fly using arguments:
#!/bin/bash # database credentials if [[ -z $1 ]]; then read -p 'DataBase-name(*): ' db else db="$1" fi # database checking and validating if [[ -z $2 ]]; then read -p 'DataBase-user(*): ' user else user="$2" fi # user checking and validating if [[ -z $1 ]]; then read -sp 'DataBase-password(*): ' pwd else pwd=$3 fi # password vaidation and checking The snippet first checks if there's an argument. If there aren't any, you use the prompt to input the value. If there are arguments, you assign the argument value to a variable that represents the given database credentials (database name, password, and so on...). Now you can run the script with arguments:
bash image.sh customers ABC-Company secret123! The image that will be created from the above script will have a database of customers, user ABC-Company, and a password of secret123!.
Bash Flags/Options
The script has a section that asks for information about the image that you're creating, but the info can be optional. With bash option/flags, you can skip the step that prompts for container information input using the -D option. This lets you explicitly keep the default container info before the script runs.
Here's an example:
#!/bin/bash while getopts "ny" options; do case "$options" in n) echo "You choose no";; y) echo "You choose yes";; *) echo "No such option/flag"; exit 1;; esac done shift $((OPTIND - 1)) In the above script:
- The while loop keeps running as long as
getoptsisn't empty getoptsgets the passed option in the script"ny"are the options we're expecting from user when running the scriptoptionsis a variable that will keep track of the input option between "n" and "y"dostarts the loopcasechecks if the selected option is in the defined option using theinkeyword- We then define what happens when we call the script with the option
-nor-yand use a double semi-colon (;;) to close the option definition - The
*is used in case the input options aren't defined. esacthen closes the casedoneends the loop so the loop doesn't continue running forevershift $((OPTIND - 1))helps avoid a conflict that may occur when the script also expects arguments by shifting the remaining arguments left over the flags, effectively discarding the flags from the parameter list.
You can then apply the syntax in the script to skip the step that asks for container info when -D is passed as an option during the script execution.
#!/bin/bash ask_container_info=true while getopts "D" options; do case "$options" in D) ask_container_info=false;; *) echo "No such option/flag"; exit 1;; esac done shift $((OPTIND - 1)) if [[ $ask_container_info == true ]]; then #Prompt the user to input custom container information read -p 'Container-name: ' container_name read -p 'Container-port(if omitted, the container will use default postgresql default port of 5432): ' port read -p 'Volume-name: ' vol_name fi There is one option here, which is why the option section only has D. ask_container_info starts as true, meaning unless the option is passed, the script will prompt the user to enter the container information. We then change the value of ask_container_info to false when the -D is passed with the script's execution.
How to Make Your Scripts Executable and Available on Your PC's Path
The next step is to make the script available and executable in every terminal you use on your machine. At the moment, the script just works in the current directory you're using to create and write your scripts.
We'll start by making the script file executable and remove the file extension from the file, so we don't need to always call our script with the .sh extension.
How to Make a File Executable
To make a file executable, use the Linux chmod command. It stands for change mode. Mode includes file permissions like write, read, and execute.
chmod +x image Here, x makes the file executable, and then you've listed the file name you want to make executable (image).
How to Add Your Directory to the system/machine Path
To make this available in every terminal you open, regardless of the directory, you'll need to register your scripts in the system paths where all global scripts and commands are stored.
To do that, copy the full path of your directory and then in your terminal type the following:
export PATH="$PATH:<YOUR_DIRECTORY_LOCATION>" Replace <YOUR_DIRECTORY_LOCATION> with your directory. This command will add the script directory into the current working terminal. But if you try to switch to another terminal and run your script, it'll fail.
Now let's configure the directory globally so every terminal will be able to execute the script:
nano ~/.bash_profile After this you should see something that looks like this:
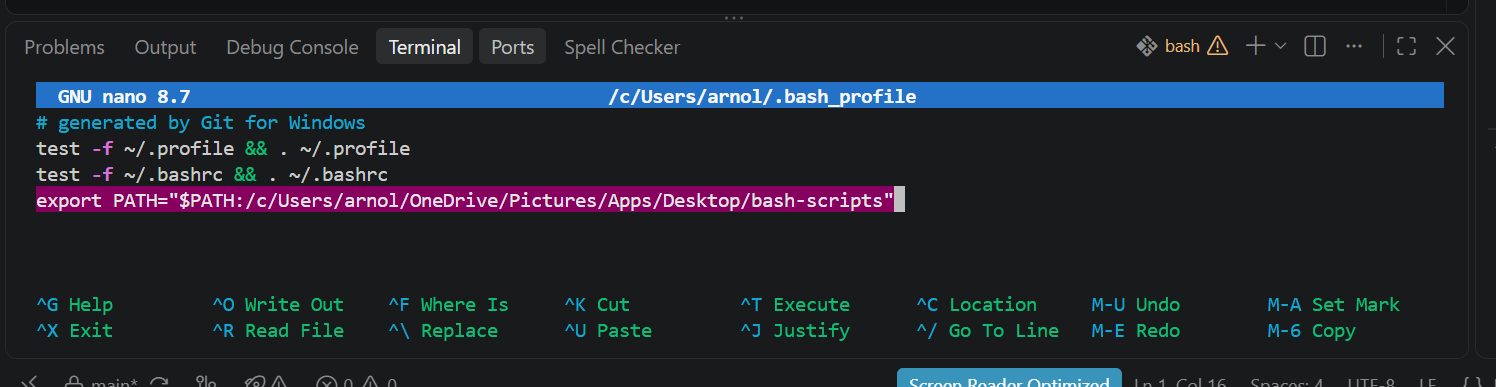
You can see in the image above that I already have my path declared in the file (see the selected text).
If it's not in you're file, you can copy-paste export PATH="$PATH:<YOUR_DIRECTORY_LOCATION>" inside the file. When you're done, press Ctrl+O and then enter to save. Then press Ctrl+x to exit the nano editor.
Then re-load the machine path again to include your scripts there:
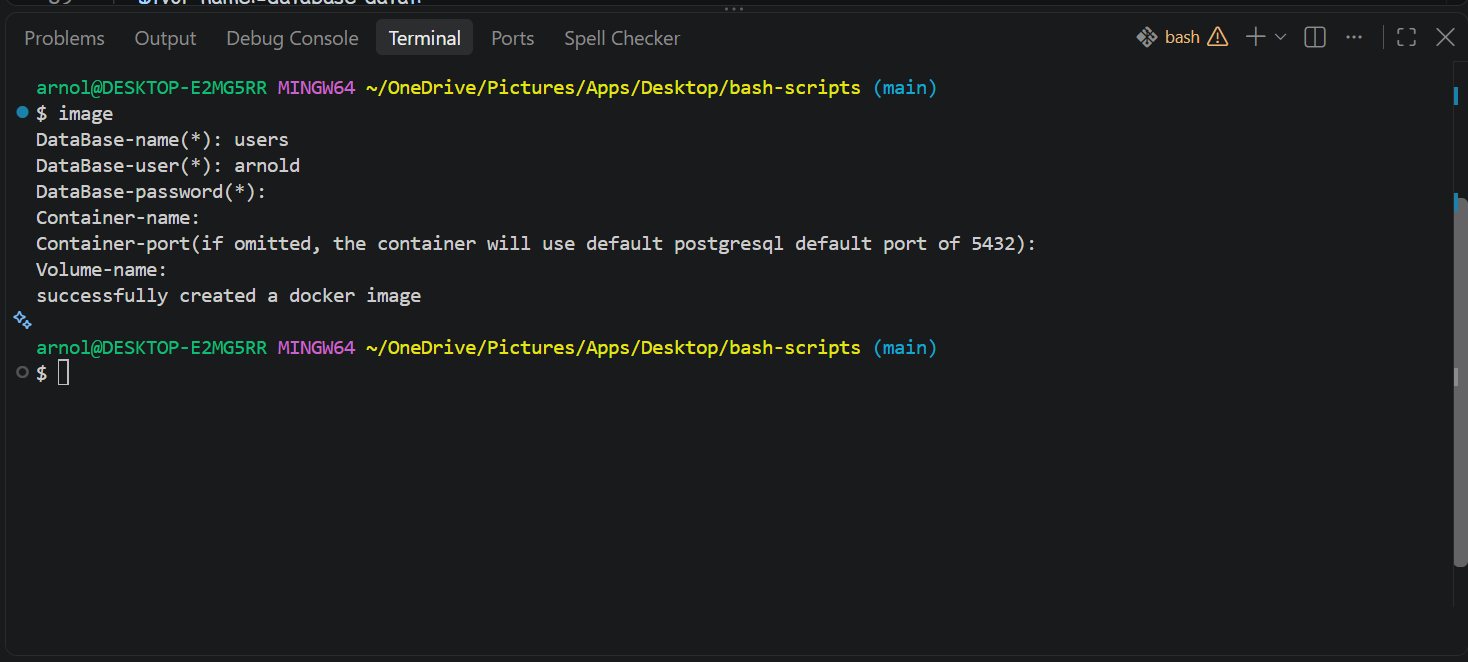
source ~/.bash_profile After this, you'll be able to run your script in any terminal on your machine using the script file name only (I named my file image):
Conclusion
In this guide, you learned how to create your own scripts to automate your workflows. I hope it helps you reduce the amount of energy and time you waste on repetitive tasks that can be automated using script commands.
You can find the full working CLI tool that we used as an example in this guide on this git-repo. There you'll find the installation guide and usage tips. If you find it helpful, please consider starring the repo and sharing it with your collogues who might benefit from it.
Thanks!