Building a GPU workstation for visual effects on Amazon EC2: Part 2 – Linux

For many years Amazon Web Services (AWS) has been guiding customers in the deployment of powerful NVIDIA GPU-backed workstations for graphics-intensive workloads. With the recent expansion of our G-series Amazon Elastic Compute Cloud (Amazon EC2) graphics-based instances, we are excited to introduce new instance families that deliver enhanced performance and capabilities. We are also refreshing our comprehensive guidance on choosing and configuring these powerful virtual workstations.
This is the second post in a five-part series, focusing on the deployment of a Rocky Linux 9.5 visual effects (VFX) workstation, using Amazon DCV as a high-performance desktop display protocol.
“Amazon DCV gives me the ability to prioritise image quality or smooth performance and playback, depending on the tasks I am performing. It adapts quickly to any monitor used and when in full screen, I forget I am operating a remote workstation.”
— Giorgio Pitino, Head of Creative Operations, Outpost VFX
Prerequisites
This post assumes that you have already configured the following:
- An active AWS account with increased GPU Amazon EC2 service quota limits.
- A valid Amazon EC2 key pair in your AWS Region of choice.
- A configured virtual firewall Security Group, with open TCP/UDP ports 22, 443, 8443, and 3389 limited to only your own IP address.
- An AWS Identity and Access Management (IAM) profile with Amazon Simple Storage Service (Amazon S3) read access, for workstation usage.
We strongly recommend that you follow Part 1 of the series, Build a GPU workstation for visual effects on Amazon EC2: Part 1 – Setup, which goes through the preceding steps in detail.
Launching the Linux workstation
The AWS Marketplace offers an official Rocky Linux 9 x86-64 Amazon Machine Image (AMI) that can be used as a base AMI for our GPU workstation.
To use this AMI, you need to subscribe to the AMI to use the updates:
- Log in to the AWS Management Console and navigate to the AWS Marketplace by searching for its name in the Service search bar, or by navigating:
Services > Cloud Financial Management > AWS Marketplace.
- Choose Discover products in the left pane.
- Search for “rocky linux 9 official” in the Search field.
- Choose Rocky Linux 9 (Official) – x86_64 to view the marketplace offering.
- Choose Continue to Subscribe to subscribe to this product.
| This product has no actual fee: other products, such as variations of Rocky Linux with support from third parties, might charge. |
- To continue, choose Accept Terms (if you agree).
- The subscription process starts, with Effective date showing pending. But when the subscription is complete (which can take a few minutes) this changes to the current date.
When the subscription process has completed, you can launch an EC2 instance from that AMI:
- Navigate back to the AWS Marketplace service console page and choose Manage subscriptions.
- Choose Launch new instance underneath the entry for Rocky Linux 9 (Official) – x86_64.
- Choose Launch instances.
- When prompted, specify your AWS Region, and choose Continue to launch through EC2.
This now opens the Amazon EC2 launch interface.
- Give the instance a name, for example “my_linux_workstation”.
- Note that the AMI has been pre-filled for you.
- Under Instance type, choose g6.4xlarge.
- Under Key pair name, open the list and choose your key pair. In the previous post we called it “ec2_test_keypair” to specify the password security credentials.
- Edit the Network settings to adjust security and network placement:
- Leave the Subnet to No preference.
- Make sure that Auto-assign public IP is set to Enable, so that you can access the instance through the internet.
- Under the Firewall (security groups) section of the Network Settings, choose Select existing security group, and specify your security group. In the previous post we named it “ec2_test_sg” to set up the firewall for the machine.
- In Configuration storage, expand the default root volume from 10 GiB to 50 GiB of gp3 storage.Important: Enable encryption in the Advanced options by checking the Encrypted option and select the default AWS managed key (aws/ebs) or a customer managed AWS KMS key for enhanced control. Amazon Elastic Block Store (Amazon EBS) encryption protects your VFX project files, renders, and application data at rest. Encryption uses industry-standard AES-256 encryption and is transparent to applications with minimal performance impact.
- Under Advanced details, specify the role that you created for workstation usage. In the previous post we called it “basic_workstation_role”, through the IAM instance profile list, so your workstation can access additional services.
- Choose Launch instance.
You can now choose the link to the EC2 instance that has been launched or view it through the Instances pane in the Amazon EC2 Service page. The following screen capture shows the newly launched workstation in the EC2 Instances list, where you can confirm it is ready to use. When the “my_linux_workstation” instance is in the Running state, and the Status check is 3/3 checks passed, you can continue.
Figure 1: A screen capture of the EC2 Instances page, showing my_linux_workstation in a ready state
Configuring the Linux workstation
Now you proceed to configure the instance with the necessary libraries and software needed to make it a capable workstation for making 2D and 3D content. From a Mac terminal, Linux terminal, or Windows PowerShell, you can now SSH into the rocky user over the public IP address. To find the Public IPv4 address, choose the EC2 instance in the Instances pane (as shown in the preceding figure), and you should find the address located in the top/middle part of the Details section.
When you are logged in to the machine, you can start with password updates and general necessary packages:
Reconnect to the instance to disable nouveau drivers, in preparation for installing the GPU drivers:
Reconnect to the instance to begin installing the GPU drivers:
| You must use AWS approved NVIDIA GPU drivers, issued through Amazon S3, not only for optimal compatibility and performance, but also to make sure that the necessary professional GRID drivers are automatically provisioned: https://docs.aws.amazon.com/AWSEC2/latest/UserGuide/install-nvidia-driver.html |
At the time of writing, these are the current steps to install the correct NVIDIA GPU drivers.
You should get an output as follows:
Now set up the Amazon DCV server to stream the desktop to your local machine/client.
The Amazon DCV server uses parameters to specify configuration options. On Linux this manifests as a file on disk.
Note: Looking to the future of Linux based workstations, DCV now supports Wayland display drivers on RHEL 10, Rocky Linux 10, CentOS 10 and Ubuntu 26.04.
Now install the Wacom drivers:
The local instance store NVMe devices need mounting. For more information, visit the Amazon EC2 User Guide.
Finally, we show some examples of application-specific library setup. Each application potentially has its own list of necessary libraries to install, which can be referenced online. The following are some examples:
And lastly, it is time to clean up.
Logging in to your workstation
To log in to your machine using Amazon DCV, you must set up the client software on your local machine:
- On your local machine/laptop, open the Amazon DCV download webpage.
- Expand the Amazon DCV Client entry that matches the Server version that you installed on your workstation.
- Choose the relevant OS for your machine/laptop, for example Windows (x86_64).
- Download the installer.
- Run the installer.
When it is installed, we need to determine the Public IP address of the workstation to connect to:
- In the Amazon EC2 Console, choose Amazon EC2 Dashboard.
- Choose Instances (running).
- Choose the “my_linux_workstation” EC2 instance, in the top pane of the screen.
- Choose the copy icon next to the Public IPv4 address in the lower pane to copy the IP address.
Finally, use the Amazon DCV client to view the workstation:
- Open the Amazon DCV client on your local machine.
- Paste the preceding IP address and press Enter, then trust the connection.
- You will see a security warning about an untrusted certificate. This is expected behavior because DCV uses a self-signed certificate by default. For this initial setup, it’s safe to accept the certificate and proceed with the connection. For a detailed explanation of why this warning appears and how to implement proper certificate security for production environments, see Amazon DCV Connection Security in Building a GPU workstation for visual effects with Amazon EC2: Part 5 – Security.
- In the next Username / Password entry field, choose rocky, and the appropriate password to which you set that user.
After the connection is established, Amazon DCV opens and displays the remote workstation desktop. The following screen capture shows the running workstation, confirming that your remote session is active and the environment is ready to use. In this example, the Rocky Linux desktop is shown with SideFX Houdini open, displaying a rendered scene in the viewport against the Rocky Linux desktop background.
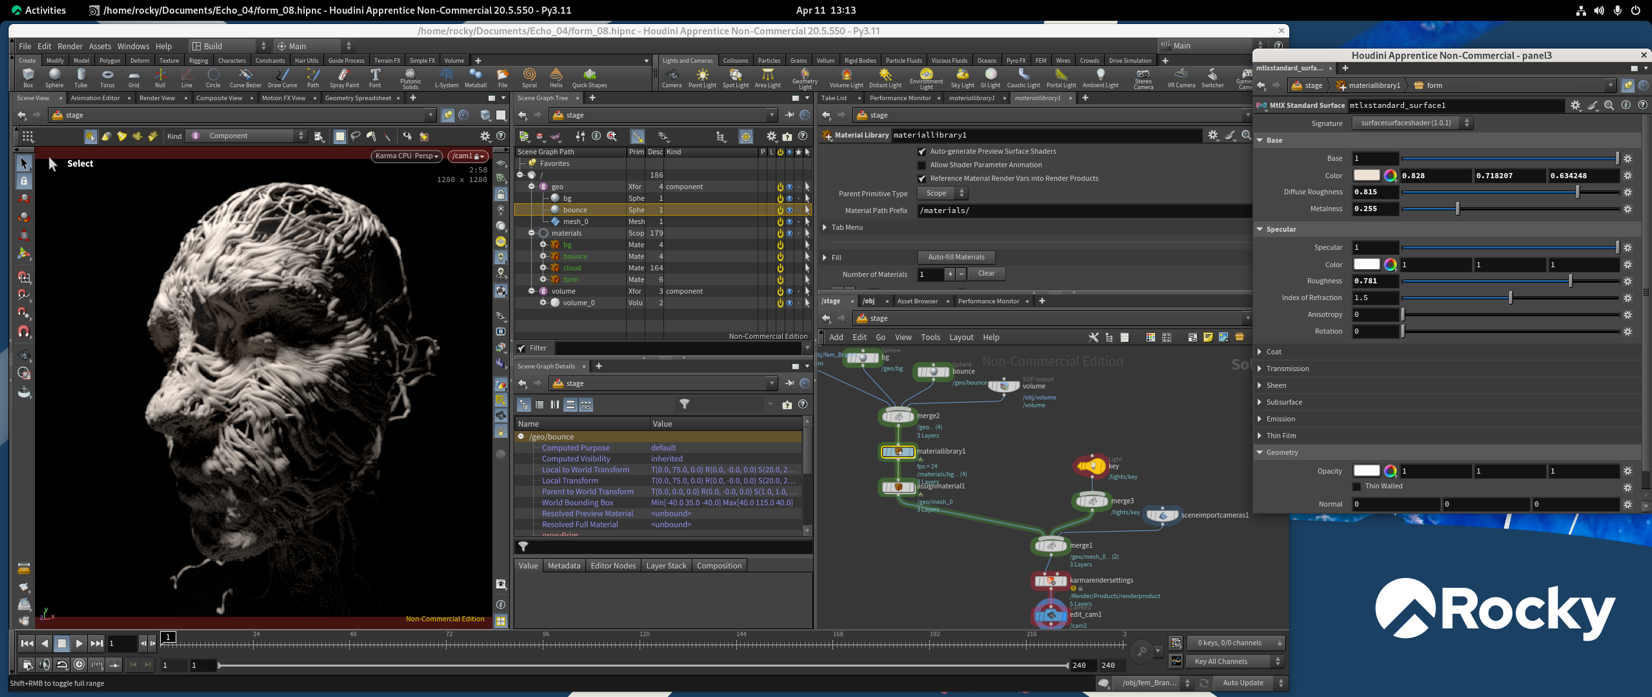
Figure 2: A screen capture of a Rocky Linux-based workstation
Cleaning up
Finally, you must turn off your instances when not in use, either through the AWS Management Console, or through other programmatic methods such as the AWS Command Line Interface (AWS CLI). You incur costs associated with a running machine, and so deactivating machines when not in use reduces your expenditure.
Deactivating instances can be done by choosing Terminate instance from the Instance state options of the workstation on the Amazon EC2 console. The instance shuts down and reports a “Terminated” state on the console, but it automatically disappears after a short time.
However, if you want to learn more about the various methods to deactivate an EC2 instance, and creating a persistent machine image of your Linux instance, then refer to Part 4 of the series: Building a GPU workstation for visual effects with Amazon EC2: Part 4 – Optimizations. Additionally, Part 4 will cover essential information on security practices for Linux EC2 instances, including build-time hardening and automated patch management to protect your workstation infrastructure from evolving threats.
Conclusion
In this post you have subscribed to and deployed an AWS Marketplace AMI of Rocky Linux to serve as your base image. Then, you modified it with GPU drivers, Wacom drivers, and other modules to make it a capable Linux-backed VFX workstation, using Amazon EC2 GPU accelerated G instance types.
You may also be interested in Part 3 of our series, Building a GPU workstation for visual effects with Amazon EC2: Part 3 – Windows, to learn how to create a Windows-backed VFX workstation.
We also recommend that you continue to Part 4 of our series, Building a GPU workstation for visual effects with Amazon EC2: Part 4 – Optimizations, to learn how to implement GPU optimizations and infrastructure to streamline the provisioning of workstations.
For more information contact us at aws-visual-compute-interest@amazon.com.
Further reading
If you want to augment a VFX workstation environment with a dedicated render farm, then consider the managed service AWS Deadline Cloud.
EC2 instance metrics, such as CPU and memory usage, are readily sent to Amazon CloudWatch logs, so you can access this data through the console and AWS CLI. This information can be pertinent to discern if an EC2 instance is being over-provisioned or under-provisioned for the work at hand. An over-provisioned instance has excessive CPU, memory, and networking resources for the current tasks and could be optimized for price. Alternatively, an under-provisioned instance does not have enough resources to cope. For more information visit the Amazon EC2 User Guide.
More advanced examples of using Amazon DCV can be found in the aws-samples GitHub repo. This includes methods to broker multiple users and instances. Furthermore, DCV Connection Gateway provides a single entry point so you can connect to multiple DCV sessions across different instances, streamlining access management and improving security through centralized authentication.
Commercial options also exist to perform artist/instance brokering, using Amazon DCV and Amazon EC2 Launch templates. An example of such an offering is Leostream.
For reference, examples of setting up Amazon DCV capable instances, using AWS CloudFormation templates as a method of deployment, can be found in this GitHub repo.
A greater depth of analysis of bit rates and latency surrounding Amazon DCV connections can be found in this AWS HPC post.